Connecting Kura to Kapua

In the past articles I independently sat up an Eclipse Kapua service using Docker containers and installed Eclipse Kura on a Raspberry Pi. Now its time to connect these and see what happens.

Preparing Kapua

At first, since Kapua is a multi-tenant installation, we need to create an organisation and an admin user in this org.

(I mostly followed the upstream documentation here:  kapua/kuraKapuaDocs.md at develop · eclipse/kapua · GitHub )

After logging into the Kapua webUI using the default admin user “kapua-sys” and password “kapua-password”, we need to create a new tenant or organization.

Unfortunately, tenants in Kapua are called “accounts” which is a little bit confusing (at least for me). Therefore we need to go to “Child Accounts” in left pane and add a new account by pressing “Add” in the upper left corner.

Let’s us as example the account “ACME123”:

Then we press “submit” and click on the new created account.

Before we create a user under this account, we have to change some settings under Settings tab below. Basically every boolean setting has to be set on true except “TagService”. Every other setting should not be changed.

In the users tab, we now can add a User:

  • Username: user123
  • Password: Kapu@12345678

The password needs to have at least 12 characters, with special characters, upper and lowercase and numbers. Because this is used in devices it should not be to easy to guess in a real world scenario.

The should now be created and we need to give this user some rights. For this, we have to switch from the master account to new ACME123 account. This can be done in the upper right corner using “Switch Accounts”.

Now we can go to the “Users” view and select the user123 user.

In the lower part we have “Role” and “Permissions” tabs.

In the “Role” tab, we add the “admin” role. After that we go to “Permissions” and grant all rights to the user.

Now we have everything ready in Kapua to connect!

Configuring Kura to connect to Kapua

After setting up Kura as described in Installing and running Eclipse Kura on a Raspberry Pi B (Model 1) ,

we can edit the cloud configuration settings.

At first we login to the Kura web interface (admin/admin).

Then we got to the “Cloud Service” view and fill in the data under “MqttDataTransport”:

  • Broker URL: mqtt://[IP address of the kapua service]:1883/
  • Topic.context.account-name: ACME123
  • Username: User123
  • Password: Kapu@12345678
  • Client-id: “rpi-1” (this needs to be the same as “device custom-name” in CloudService

Then go to “DataService” and set “connect.auto-on-startup” to true.

All other fields remain unchanged.

Now its time to clck “Connect” and the device is shown as connected,

In Kapua, the newly connected device is now visible under “Devices” and “Connections:
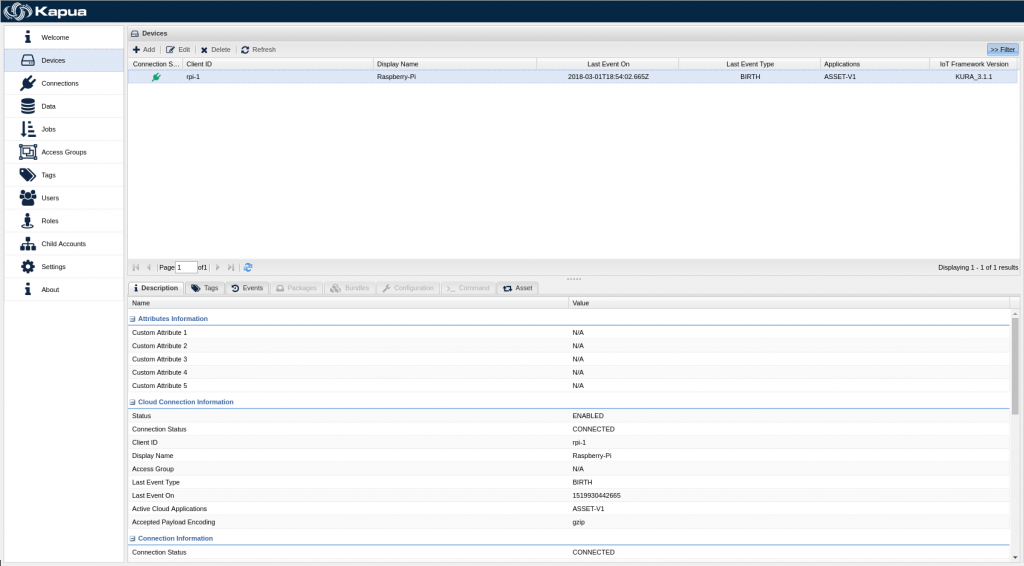
Screenshot Device Management in Kapua


Kura is now fully configured and ready to send some data.

Sending Data to Kapua

As you can see, our data sections Kapua is empty. That is because we did not yet send any data to it. So in this example we will user Example publisher deployment package, which can be obtained from Eclipse marketplace.

This bundle sends some data to provided Cloud (in our case Kapua). We will use it to verify our connection. Click here to visit Example Publisher page.

Click on download button and copy the link address (it has .dp extension) and paste it into Kura -> Packages -> Install/Upgrade -> URL.

Now we need to activate the service:

Click “+” right from search box. Under Factory select org.eclipse.kura.example.publisher.ExamplePublisher, set a Name of your choice and click Apply.

Example publisher then automatically starts sending data to Kapua, which can be verified in kura.log file or in Kapua itself (kura.log file is in on Raspberry Pi in /var/log folder).

Data in Kapua can be observed under “Data”.

This looks very promising and I will continue with the next steps:

  • import Kapua into OpenShift and create a template for an automated deplyment
  • connecting sensors to the Gateway and generate some useful data!

Installing and running Eclipse Kura on a Raspberry Pi B (Model 1)

Now that I have a running Kapua instance, its time to look at the network edge to gateways and devices.

Eclipse Kura is a Java/OSGi-based framework for IoT gateways. A gateway is a devices that is distributed at the network edges and communicates with sensor or steering devices using cables, Bluetooth or other private networks.

Sins Kura supports a rather broad range of small devices, my plan is to use a spare Raspberry Pi as gateway hardware.

Unfortunately my old Raspberry PI B is from the first generation, based on the ARMv6 architecture with 512 MB RAM. Therefore I cannot base the OS on Fedora that needs at least Model 2 and ARMv7 or ARMv8 architecture, so that I need to use Download Raspbian for Raspberry Pi  for this. I choose the small server set and write that to the SD card:

unzip -p 2017-11-29-raspbian-stretch.zip | sudo dd of=/dev/sdX bs=4M conv=fsync status=progress

Now inserting the SD card into the Pi, connecting LAN and booting. By default, ssh is disabled so I had to connect a keyboard and monitor and do that manually.

Login as user “pi”, password: “raspberry” (this should be changed asap!)

systemctl enable ssh.service
systemctl start ssh.service
hostname -I

(this will give you the IP address where to connect to.

Now the fun can begin. I typically copy my ssh-key and login from my workstation:

ssh-copy-id ~/.ssh/id_rsa.pub pi@<ip_of_pi>
ssh pi@<ip_of_pi>

Now its time to install Eclipse Kura! Get the latest version from here. Since I have the old Raspberry model I choose this one.  For the installation I mainly followed the Raspberry Pi Quick Start documentation but I will show the steps here, too.

After booting the Pi several steps are needed on the Raspbian OS: At first, the dhcpcd5 packages needs to be removed:

sudo apt-get purge dhcpcd5

then its useful to install the gdebi command tool to find all dependencies needed:

sudo apt-get update
sudo apt-get install gdebi-core

And finally install Java:

sudo apt-get install openjdk-8-jre-headless

Finally, the package can be downloaded and installed:

wget http://download.eclipse.org/kura/releases/<version>/kura_<version>_raspberry-pi-2-3_installer.deb

Note: replace <version> in the URL above with the version number of the latest release (e.g. 3.1.1). Install Kura with:

sudo gdebi kura_<version>_raspberry-pi-2-3_installer.deb

Since Kura will make use of a wifi card to connect to devices, I also inserted a wifi dongle. And now its time for a reboot!

Kura starts up automatically and presents a web UI:

http://<ip-of-pi>
Username: admin

Password: admin
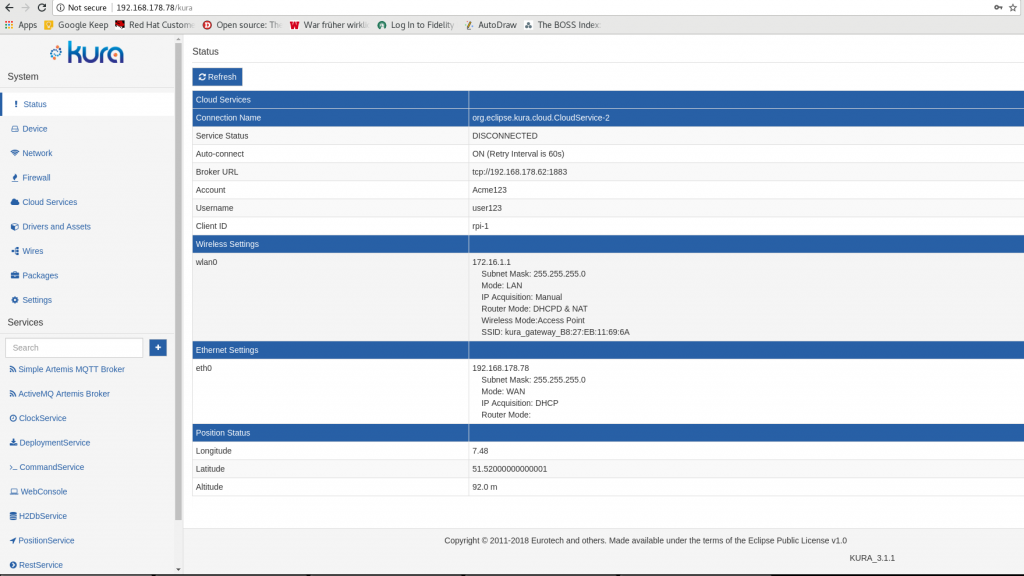
Eclipse kura screenshot
Screenshot from Eclispe kura running on Raspberry Pi B

That’s it! Stay tuned for the next part: Connecting Kura to the central Kapua instance.

Creating a standalone instance of Eclipse Kapua using Docker containers

Today I start with taking a deeper look at Eclipse Kapua. It is a modular IoT cloud platform to manage and integrate devices and their data.

My goal for the next weeks will be to demonstrate a multi-tenant capable installation of Eclipse Kapua on OpenShift, connecting several IoT devices and gateways to it.

As a first step, I will setup Kapua as a standalone application using pre-built docker containers.

Then I will use a raspberry pi running Eclipse Kura to connect to Kapua and send test data.

Next steps will be the port to OpenShift making use of persistent storage and scalability. And connecting sensors to the raspberry pi gateways to send  some useful data.

Setting up Kapua if you have a running docker service is fairly easy:

You need to have a 64bit architecture, Docker version > 1.2, roughly 8 GB of free RAM and access to the internet to fetch the pre-built containers from docker hub.

docker run -td --name kapua-sql -p 8181:8181 \
    -p 3306:3306 kapua/kapua-sql:0.3.2
docker run -td --name kapua-elasticsearch \
    -p 9200:9200 -p 9300:9300 elasticsearch:5.4.0 \
   -Ecluster.name=kapua-datastore \
   -Ediscovery.type=single-node \
   -Etransport.host=_site_ \
   -Etransport.ping_schedule=-1 \
   -Etransport.tcp.connect_timeout=30s
docker run -td --name kapua-broker --link kapua-sql:db \
    --link kapua-elasticsearch:es \
   --env commons.db.schema.update=true \
   -p 1883:1883 -p 61614:61614 kapua/kapua-broker:0.3.2
docker run -td --name kapua-console --link kapua-sql:db \
    --link kapua-broker:broker \
   --link kapua-elasticsearch:es \
   --env commons.db.schema.update=true \
   -p 8080:8080 kapua/kapua-console:0.3.2
docker run -td --name kapua-api --link kapua-sql:db \
    --link kapua-broker:broker \
   --link kapua-elasticsearch:es \
   --env commons.db.schema.update=true \
   -p 8081:8080 kapua/kapua-api:0.3.2

Each line will then fetch the container and start them.

In order to make the service accessible, I also add some firewall rules on my docker host:

firewall-cmd --add-port 8080/tcp
firewall-cmd --add-port 8081/tcp
firewall-cmd --add-port 1883/tcp

Thats all. Now you can acces the Kapua Web GUI on

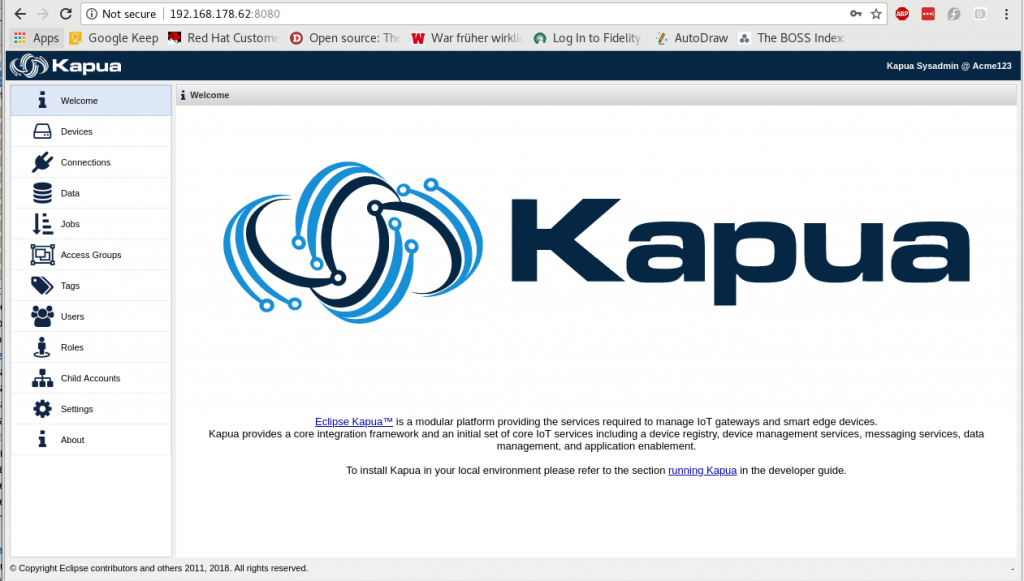
http://<ip_of_docker_host>:8080

Screenshot of Eclipse Kapua Web UI

The default credentials are:

Username: kapua-sys

Password: kapua-password

Additionally there is a message broker running at

tcp://<ip_of_docker_host>:1883
Username: kapua-broker

Password: kapua-password

And a RESTful API under

http://<ip_of_docker_host>:8081/doc
Username: kapua-sys

Password: kapua-password

That really was easy. Lets see what we can do with it. Stay tuned for the next part: Installing Eclipse kura on a Raspberry Pi.

An Internet of Threads or will there also be Something in Open Source?

Currently I play with IoT devices and connected “things”, and as much they fascinate me, mostly they are quite locked and when the vendor loses interest, money or disappears from the market, these things mutate to ubiquitous threads and begin to scare me.

Sure, most of the stuff is built on Linux, but passwords or access is blocked and if there is no merciful vendor that takes care of automated updates they rot and become vulnerable.

Additionally, sometimes even the communication protocols are unknown, insecure and create a lock-in to the original vendor and its “intellectual property”.

In an ideal world there will be an Open Source based software stack that is capable of a standard based communication, secured connection with controlled data flow and ways to manage the zillions of devices connected to and managed by the central management.

And, although the world is not perfect, something like this seems to exist: In the Eclipse community, there is the IoT Community!

I specifically looked into the IoT device middleware Kura  and the cloud based management platform Kapua.

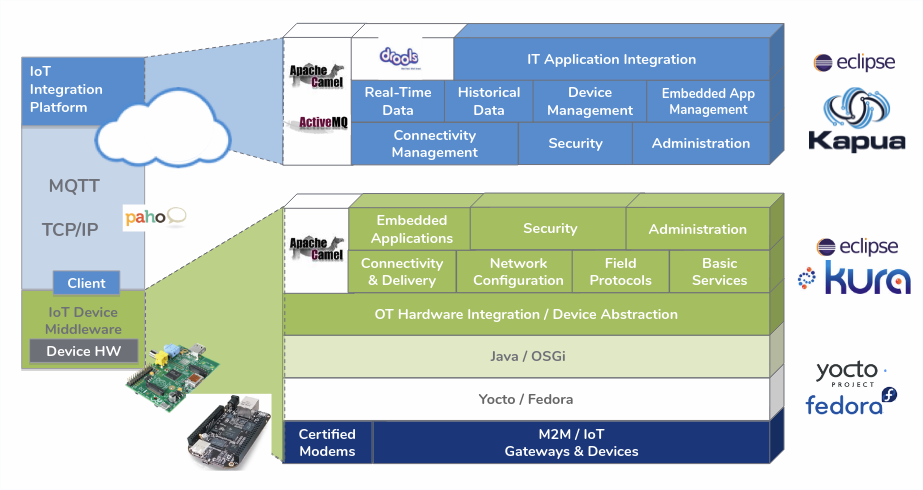
With these tools and a secure MQTT based communication, an Open Source, standards based IoT stack can created:

Eclipse IoT Stack

This not pure academic stuff, but real code! Interesting companies like Eurotech, Bosch and my employer Red Hat are investing into these projects.

My goal in the coming weeks will be to look deeper into these projects, make them available in an on-premise installation and have a lot of fun. And yes, I will write about that here. So stay tuned.